Hello,
Mark the date - Today is the day you’ll have your very first AI app! :)
This lesson might be a bit long, so I’ll keep it short.
Just make sure your prompt is ready to go.
If it’s not, go back to the last email and finish the assignments first.
...
...
...
...
...
Now, let’s say you have this prompt ready (this is from the last email):
"I would like to sell my {{product}} to a {{occupation}}. Write me {{numbers}} {{style}} quotes that I can use to sell my {{product}} during the {{occasion}}.
The result must follow this structure exactly:
- No explanation or description, just a list of quotes.
- Use numbered bullet points only.
Let’s do it now."
Great! Let’s move to the next step.
Time to Find a Chef
Think of your prompt as ingredients.
Before we can enjoy them, we need a chef to cook them, right?
The AI engine is like our CHEF.
We bring the ingredients (your prompt) to the chef and wait to see which chef cooks the best dish!
In the last lesson, we picked ChatGPT as our chef. We’ll keep using ChatGPT, but just so you know, your prompt can work with other AI engines too.
In the future, you can try it with Google’s Gemini, Anthropic’s Claude, Meta’s Llama, and others.
But for now, we’re sticking with OpenAI’s GPT.
Hiring the Chef
Now, we need to pay the chef for their work.
You might think, “I already pay for ChatGPT Plus, so I’m good, right?”
Well, it’s a little different when you’re building your own AI app.
The good news is, it’s SUPER cheap!
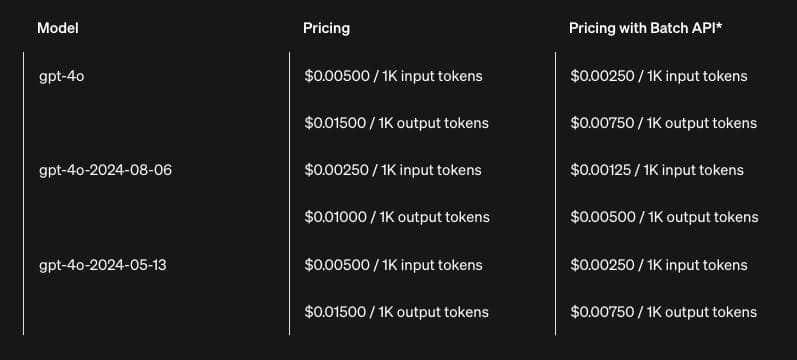
I’m not going to explain tokens or how to calculate costs, but here’s the important part:
- The cost is dropping because there’s a lot of competition.
- You’d need a lot of users for your AI app to spend the same $20 as ChatGPT Plus!
- And if you have that many users, you’ll have income to cover the cost.
Now, let’s get what’s called an “API key.”
If you were using Google’s Gemini, you’d get the key from them.
But since we’re using ChatGPT in this mini-course, here’s how to get an API key from OpenAI:
- Open your web browser and go to https://platform.openai.com
- If you don’t have an account, sign up.
- Sign in and visit https://platform.openai.com/api-keys
- Click “Create new secret key” (it’s at the top right).
- Enter a key name and leave all options as they are.

Copy the key and save it somewhere safe.

And that’s it! Your API key is ready.
Let’s move on to the next step.
The Chef is Hired, Now It's Time to Open Your Restaurant
You’ve got your prompt and your API key from OpenAI.
Now you’re ready to build your very own AI app!
There are many ways to build AI apps, but in this mini-course, we’ll use Dify.AI as your buddy!
Ready?
Let’s get started with the most exciting part.
Follow these steps, and your first AI app will be ready in just 5 minutes! :)
1. Go to https://dify.ai and sign up for a new account if you don’t have one yet.
2. Log in to https://dify.ai.
3. Click the “arrow” icon near the top right next to “Dify” and then click on “Settings.”

4. On the left side, click “Model Provider,” find the “OpenAI” model, and click the “Setup” button.

5. Paste your API key from OpenAI into the box, then click “Save.”

6. Visit https://cloud.dify.ai/apps.
7. Click the “Create from Blank” button.

8. Choose “Text Generator,” enter your AI app’s name, and click “Create.”

9. Copy your prompt and paste it into the “Prefix Prompt” box.
"I would like to sell my {{product}} to a {{occupation}}. Write me {{numbers}} {{style}} quotes that I can use to sell my {{product}} during the {{occasion}}.
The result must follow this structure exactly:
- No explanation or description, just a list of quotes.
- Use numbered bullet points only.
Let’s do it now."

10. Click outside of the “Prefix Prompt” box, you will see a pop-up like this, just click on “Add” button.

11. In the “Variables” box, find the variable key “query” and click the “bin” button to delete it.

12. Click the “gear” button next to the “numbers” variable.

13. Select “Number” and then click “Save.”

14. Scroll down to “Vision” and turn it off.

15. On the right side, choose the AI engine you want to use. For this course, we’ll pick “gpt-4o-mini.”

16. Click on “gpt-4o-mini” and adjust the settings to match this:

17. In the “Debug and Preview” area, enter some values to test your AI app, then click “RUN” and wait for the result.

18. If you see a result like this, you’re just one step away from having your AI app! Click the “Publish” button at the top right.

19. Click the “Update” button.

20. Now, click “Run App.”

21. Your browser will open your first AI app in a new tab! Just copy the URL from the address bar and share it with others.

22. All done!
Have you realized that you’ve just created your FIRST AI app? :)
What is Dify.AI?
Dify.AI is a powerful tool that can do a lot of AI tasks, but here’s the simple version:
- It helps regular people create a simple AI app that’s ready to use on the cloud, without needing web hosting or complicated servers.
- It makes switching between different AI engines easy. Today, we used ChatGPT, but tomorrow, you can switch to another AI super easily.
- It’s great for expanding into full-scale AI app development. What you did in Dify.AI can be the starting point if you want to make a better version of your AI app in the future.
Dify.AI can do so many things, but we’ll stop here for this mini-course.
We’ve covered a lot today, and you might need some time to explore and play around with Dify.AI.
So, that’s it for today!
Tomorrow, I’ll share my mistakes from my journey in building a million-dollar SaaS, so you can learn from them and avoid making the same ones.
Have fun with your first AI app, brotha!
See ya tomorrow…
—Bank K.
P.S. If you've finished your first AI app, don't forget to share it with me! I can't wait to see what you've created!
