Hello,
Before we dive into today’s setup steps, I want to tell you something that just happened…
I got a few new orders from my Shopify store this past week. But here’s the interesting part: Two of them didn’t come from ads.
They didn’t come from Facebook. Not Pinterest, not Instagram. Not YouTube.
They came from ChatGPT.com.
Yep — the source inside my Shopify dashboard literally says: ChatGPT.com
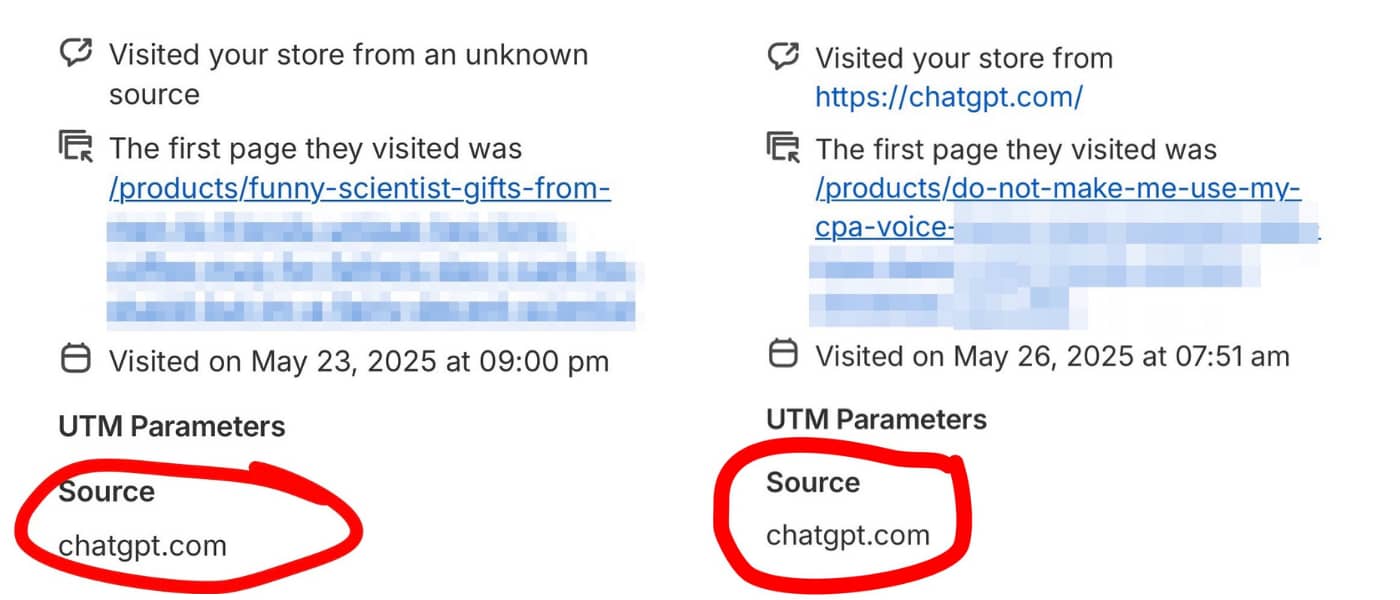
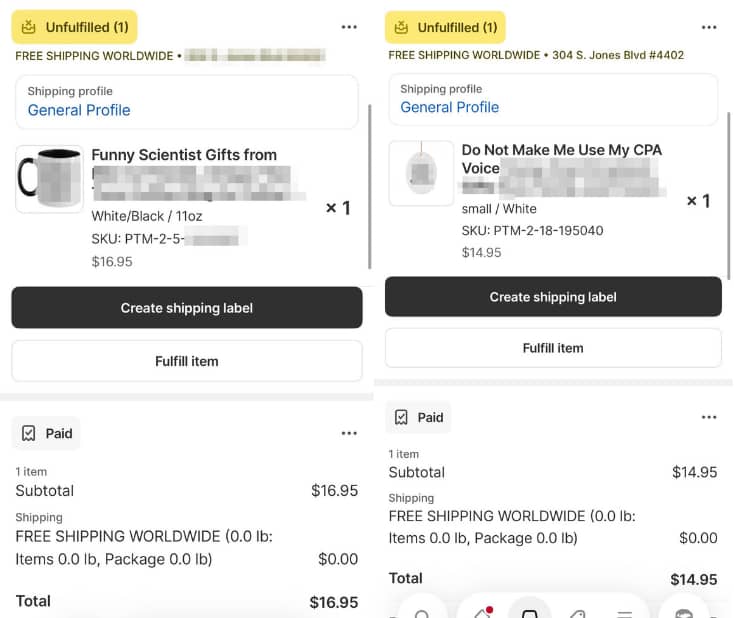
What did they buy?
One was a two-tone coffee mug with a funny quote about scientists. Another one was an ornament made just for CPAs.
Both were uploaded from PODtomatic.
I’m guessing someone asked ChatGPT something like:
“What’s a good gift for a scientist?” or “Gift idea for a CPA?”
And boom — my products showed up.
That’s when it hit me again:
**AI is already acting like a search engine.** This isn’t theory. It’s real. It’s happening now.
🧠 What Is AI SERP?
When people ask tools like ChatGPT, Perplexity, or Gemini for gift ideas, they don’t get ten blue links anymore.
They get answers. And inside those answers are links — sometimes to stores, blogs, or product pages.
If your store has:
- clean structure
- keyword-rich pages
- and niche-specific content
AI can find it — and recommend it.
That’s exactly what happened to me.
So here’s the new mindset I want you to adopt:
We’re building a store that people love, and AI understands.
From day one, I recommend you use AI to help build your store.
Ask ChatGPT to:
- suggest your store name
- write your meta title and description
- generate SEO tags
- write your About page
- create your newsletter intro
- help draft policies and product descriptions
- etc.
The more clearly you teach AI what your store is, the more confidently it will recommend it.
Most sellers aren’t doing this yet.
You are.
And that gives you an edge.
So, let’s build a store that’s clean, trustworthy, and AI-aware.
Today, we lay the foundation.
🧱 Build the Base — Set Up Your Shopify Store
Not pretty. Just profitable. We want it clean, functional, and ready to scale.
I don’t want this to be just “another Shopify tutorial.”
You can find better technical walkthroughs on YouTube.
This guide is different.
It’s focused, story-driven, and built around 12 key checklists — each one designed to help your store grow traffic organically (and be AI-friendly).
Let’s dive in.
✅ 1. Sign Up for Shopify
We’re laying the foundation. Shopify is the “home” for your store.
There are many platforms out there, but Shopify is easy to use — and more importantly, it supports Smart Collections, which we’ll use to automate traffic growth.
Right now, Shopify is offering 3 months for $1/month.
Take the deal 👉 Shopify $1/month
That’s more than enough time to get set up, test things, and make your first sales.
🌐 2. Pick & Register Your Domain
This is your store’s identity.
It’s how people — and AI — will find you, link to you, and talk about you.
Don’t get too niche. You’ll be selling across many topics, so names like DogMugs4Life can be limiting.
Pick something simple and brandable — like BrightGiftCo or LoopGifts.
Bonus tip: Domains with “gift” or “gifts” tend to perform better, since those words match real buyer search terms.
Ask ChatGPT:
“I’m building a print-on-demand store selling mugs, accessories, and gifts. Suggest 10 brandable domain names that include ‘gift’.”
Once you’ve picked your name, I recommend buying your domain from Cloudflare.
It’s cheap ($10/year), secure, and gives you free domain protection + private email routing.
🔗 3. Connect Your Domain to Shopify
This is like telling the internet, “Hey, when someone types in my domain, send them to my Shopify store.”
In Shopify, go to Settings > Domains and click Connect existing domain.
Shopify will guide you through the process. If you registered your domain with Cloudflare, the setup is quick and painless.
Once connected, your store will be live — even if it’s still empty.
📬 4. Set Up a Free Support Email (Cloudflare + Gmail)
We want your store to look legit.
Instead of using something like [email protected], we’ll create [email protected].
Cloudflare lets you forward this email to your regular Gmail, for free.
Then inside Gmail, you can reply from that support address using “Send mail as.”
You now look professional, without paying for Google Workspace.
Need help setting it up? Ask ChatGPT:
“Teach me how to forward domain email from Cloudflare to Gmail and set up ‘Send mail as’.”
If you get stuck, message me — I’ll help.
This saves you at least $70/year.
And it makes your brand look 10x more legit.
🎨 5. Install and Customize a Free Theme
This is what customers will see when they land on your store.
The goal? Clean, fast, and easy to browse.
Use the free Spotlight theme. It’s mobile-friendly, conversion-optimized, and simple to customize.
I’ve used it on stores that generated over $1 million in sales. It works.
Upload your logo. Tweak the fonts and colors if you want. But keep it simple and clear.
🚚 6. Set Up Shipping Rates
This part affects your profit margins, so read carefully.
When I first started, I assumed most of my orders would come from the U.S., so I offered free worldwide shipping and raised product prices slightly.
Then orders started coming in from places like Australia, Spain, and the UK…
And the international shipping costs from CustomCat were way higher than expected.
I barely broke even 😅
So now I do this:
- Charge $4.95 shipping for U.S. orders
- Charge $14.95 for international orders
- Offer free worldwide shipping on orders over $100
Go to Settings > Shipping and delivery to set this up.
Start simple: one rate for U.S., one for international.
Tweak later if needed.
💳 7. Set Up Payments
This is how you get paid — so don’t skip it.
If Shopify Payments is available in your country, use it.
If not (like in my case), connect Stripe and PayPal.
Both work great with Shopify and cover nearly all major countries.
Head to Settings > Payments to set it up.
🛒 8. Customize Your Checkout Page
If someone’s at checkout, they’re close to buying — don’t scare them off with a clunky experience.
Here’s how I simplify it:
- Collect email only (not phone or company name)
- Make Address Line 2 optional
- Add a tipping option (yes, people do tip!)
- Upload your store logo to the checkout page
You’ll find all this under Settings > Checkout.
Less friction = more conversions.
📈 9. Add Google Analytics + Facebook Pixel
Even if you’re not running ads yet, it’s smart to collect data now.
Google Analytics 4 helps you track traffic, bounce rates, and behavior. Meta Pixel (Facebook) helps you retarget visitors later if you run ads.
Here are the links to Shopify’s setup guides:
Set them up once, and you’re good.
🔍 10. Add Your Store to Google Search Console
This helps you see how many of your pages are indexed on Google — and how much organic traffic you’re getting.
Go to 👉 Google Search Console
Click “Add Property” and enter your domain.
If you used Cloudflare, verification is simple.
This is how you track how many people find your store on Google and how many click in (CTR). It’ll be important later.
📃 11. Create Basic Pages + Store Policies
People (and Google) need to trust your store.
Create these pages:
- About Us — keep it honest, short, and story-driven
- Contact Us — include a form
- FAQ (optional for now)
Ask ChatGPT:
“Act as a top storyteller. Write an About Us page for a print-on-demand gift shop run by [insert your story].”
Also go to Settings > Policies and generate:
- Refund Policy
- Privacy Policy
- Shipping Policy
- Terms of Service
These show up at checkout and help build trust.
⚙️ 12. Final Setup Checks
Just a few loose ends to tie up:
- Set your timezone and currency — go to Settings > Store details
- Add a favicon — ask ChatGPT to generate one or use a simple icon (Online Store > Themes > Customize > Theme Settings > Favicon)
- Turn off password protection — Go to Online Store > Preferences > uncheck “Password protect” Click Save
At this point, your store is real.
It’s clean. It’s live. It’s ready.
No products yet. No collections yet.
That’s coming next.
But what you’ve built today?
It’s the kind of store that customers trust — and AI wants to recommend.
Take your time. There’s no rush.
You’re not building a temporary hustle — you’re building a real store.
If you hit any issues, just reply. I’ll help.
🔜 In Episode 2:
We’ll set up Smart Collections — the secret to turning your store into a keyword magnet.
You’ll be able to rank for terms like:
- Funny mugs for programmers
- Gifts for engineers
- Coffee mugs for teachers
Each collection becomes a self-updating SEO page. And once products are added — they go straight into the right spots.
One setup. Endless opportunities.
Talk soon,
—Bank K.
P.S. If you made it all the way to the end… I’d love to hear from you.
Just hit reply and tell me where you’re at. Even a simple “I’m working on it!” means the world.
Last time I got over 100 replies.
You guys rock. The more I hear from you, the faster Episode 2 will be cooked and served!
