A few years ago, I couldn’t run my print-on-demand business alone.
I’m not good at art, so I hired graphic designers to create designs for me. I hired virtual assistants to answer customer emails and upload products to my stores. I also hired a video editor to make video ads.
That’s a lot of people. And a lot of money every month.
Now, I run two niche stores all by myself. No designer. No VA. No video editor.
Just me and my team of AI. :)
But here’s something interesting. I don’t let AI do everything.
After using AI every day for a while, I found that it works best like this:
AI does the making. I do the deciding.
AI creates designs, mockups, videos, product descriptions, and email replies for me. That’s the work I’m not good at, or the work that takes too much time.
But I still decide what to sell, which ads to cut, and which ads to scale. That’s where the money is.
In this post, I’ll show you my daily routine step by step. You’ll see how I run niche stores with Facebook Ads, which AI tools I use, and which steps I still do by hand (and why).
Full disclosure: I built some of the tools in this post, LzyPOD, LzyReply, and LzyPost. I built them to use in my own stores first, then opened them up for other print-on-demand sellers. You can use any tools you like. The routine is what matters.
Let’s dig in.
My Setup
Before we start, here’s what I’m working with:
- 2 Shopify stores
- 1 niche per store. I don’t sell general products. (Here’s why I prefer small niches.)
- CustomCat to print and ship my products
- Facebook Ads for traffic
- About 4-5 hours of work a day
That’s all. Nothing fancy.
Why I Sell on My Own Stores (Not Marketplaces)
I read print-on-demand groups on Reddit a lot. Most people there sell on marketplaces like Etsy, Redbubble, or Amazon Merch.
There’s nothing wrong with that. I’ve sold on Etsy and Amazon for years too.
But when you sell on a marketplace, you play by their rules. They set the fees. They can change the algorithm anytime. They can close your shop. And the customers belong to them, not you.
When you run your own store and send traffic with ads, you’re in control. You set the price. You build your brand. You keep your customer list. And you decide how much traffic you want.
More sales. More control. That’s why I prefer it.
Yes, ads cost money. But if you test the right way, you won’t burn much. I’ll show you my numbers below.
My Daily Routine at a Glance
I wake up around 11:00 AM and check my ads and messages first thing. Then I start the main work around 1:00 PM. (Yeah, I’m a late starter. lol)
Since I’m in Thailand, this works great with my customers in the US.
| Time | What I do | Time spent |
|---|---|---|
| 11:00 AM | Step 1-2: Check ads and reply to customers | 30 min |
| Break | ||
| 1:00 PM | Step 3-8: Ideas, designs, products, launch ads | About 3 hours |
| Break | ||
| 11:00 PM | Step 9: Scale winning ads | 30-60 min |
| 1-2 times a week | Step 10-11: Store housekeeping and social posts | Varies |
Okay, let’s go through each step.
Step 1: Check My Facebook Ads (No AI)
Yeah, I know it’s called “Meta Ads” now. But I’ve called it “Facebook Ads” for years, and it’s hard to change. lol
When I open my laptop, the first thing I do is check yesterday’s ad performance.
I look at:
- How much I spent yesterday
- How much profit I made yesterday
- Cost per link click (CPC) in the last 7 days
- Cost per link click in the last 30 days
I always zoom out.
I rarely judge a campaign by yesterday’s results alone. One bad day doesn’t mean a bad campaign. The last 7 days and 30 days show the real picture.
Then I cut the losers. These are my cut rules:
- Spent money with no sale → pause it
- CPC higher than $2 and no sale → pause it
- Cost per purchase higher than my breakeven → pause it
In case you don’t know, breakeven is the most you can pay for one sale without losing money.
Breakeven = Sale Price - Cost of Goods (COGS)
For example, if I sell a T-shirt for $24.95 and it costs me $12 to print and ship, my breakeven is:
Breakeven = $24.95 - $12 = $12.95
If I pay more than $12.95 in ads to get one sale, I lose money on every order. So that ad has to go.
I know people say AI can run your ads now. But I don’t use AI in this step. Cutting ads is a money decision, and I want to make it myself. It only takes a few minutes anyway.
Step 2: Reply to Customers (AI Helps)
Next, I check my Facebook comments and email inbox.
Late morning in Thailand is night time for my customers in the US. Their messages pile up while I sleep, so this is when I answer them.
Facebook comments
I write a quick reply first. Then I give the customer’s question and my draft to AI and let it write a nicer reply.
English isn’t my first language. My English is short, punchy, and not always correct. (You’ve probably noticed this if you’ve read my blog for a while. lol)
AI helps me a lot here. Now my pages sound like friendly, polite people run them.
Customer emails
Most customer emails I get are the same few types:
- “Where is my order?” I need to check the tracking info and tell the customer where their order is.
- “My mug is broken.” I need to ask the customer for a photo, then pass it to my supplier so they can send a replacement.
- “The shirt is the wrong size.” I need to ask for a photo of the product, check the size, then pass it to my supplier.
And so on.
None of these are hard. But they take time. Open the email, find the order, check the tracking, write the reply… over and over again.
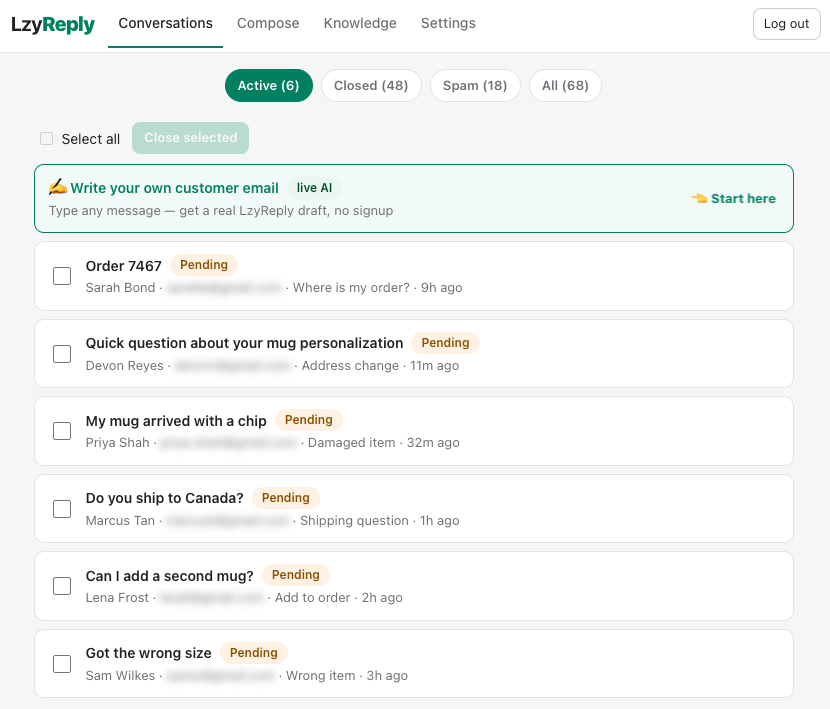
For emails, I use LzyReply.
It reads all my emails. If the email is from a customer, it finds their order in my Shopify store, checks the order status, and drafts a reply for me.
The secret is the knowledge base.
I added all my answers to it before. How to handle “where is my order” emails. What to do when a mug arrives broken. What to ask for when the size is wrong. Things like that.
So when a new email comes in, LzyReply looks at three things:
- The customer’s message
- The order details in my Shopify store
- My knowledge base
Then it drafts the right reply. If a customer says their mug is broken, the draft already asks for a photo. If they ask where their order is, the draft already has the tracking info.
It’s like having a support VA who already knows all my rules. Without paying a VA. lol
I just open the app, read the email and the draft, and hit SEND.
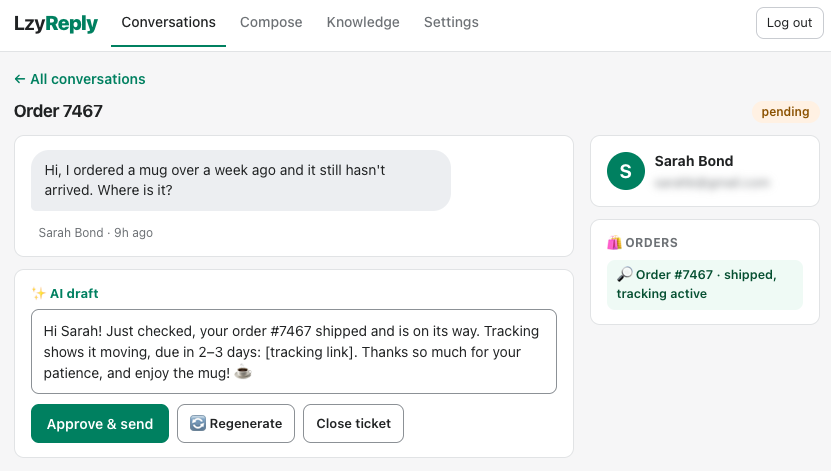
The reply is already drafted. I just check it and hit SEND.
Before, I had to:
- Open the email
- Find the order in Shopify
- Check the order status
- Write a reply
- Hit send
Now I just read and hit send. No more jumping between my inbox and Shopify.
Steps 1 and 2 take me about 30 minutes. Then I take a break.
Step 3: Find New Ideas (Mostly No AI)
This might surprise you. I don’t use AI to do my research.
I tried. AI can come up with ideas, but they’re too basic. Maybe fine for general stores, but I run niche stores. My customers want products that feel made just for them. AI doesn’t go that deep yet.
So I do the research myself.
I go to Etsy and Amazon and search for products in my niches. I look for products that already have reviews.
Why reviews? Because reviews mean real people bought them. That’s proof the idea sells.
Then I read the reviews. What do people love? What do they say about the product?
After that, I pass the products and reviews to AI and let it come up with new design or quote ideas. Something like this:
“Here are products that sell well in my niche and what buyers say about them. Give me 20 new design and quote ideas with the same feel, but different.”
I pick the best 3-5 ideas and toss the rest.
Quick note: use other products for ideas, not to copy. Never copy someone else’s design, and stay away from trademarks.
Step 4: Choose Products (AI Helps A Lot)
Now I have ideas. Next question: what product should I put them on?
A T-shirt? A coffee mug? A poster? Something else?
I ask AI. I give it my idea and let it list the products that fit best.
Honestly, this step has surprised me the most. AI has suggested products I never thought of selling. And they sold.
Which products? Sorry guys… I won’t tell you my secret products. lol
But you should try this yourself. Ask AI, test what it suggests, and see what your customers like. You might find your own secret products too.
Tip: Give AI the product list from your supplier first. That way, it only suggests products you can actually sell.
Step 5: Create Designs (AI Does It)
Now it’s time to create designs.
This is the job I used to hire graphic designers for. Now I use LzyPOD. It’s the AI tool I use for all my graphic work: designs, product mockups, product videos, and video ads.
I go to the Create Design menu and type in my idea.
I usually use the Ideogram V4 Turbo model. It creates great designs and removes the background almost perfectly. There are other models you can try too.
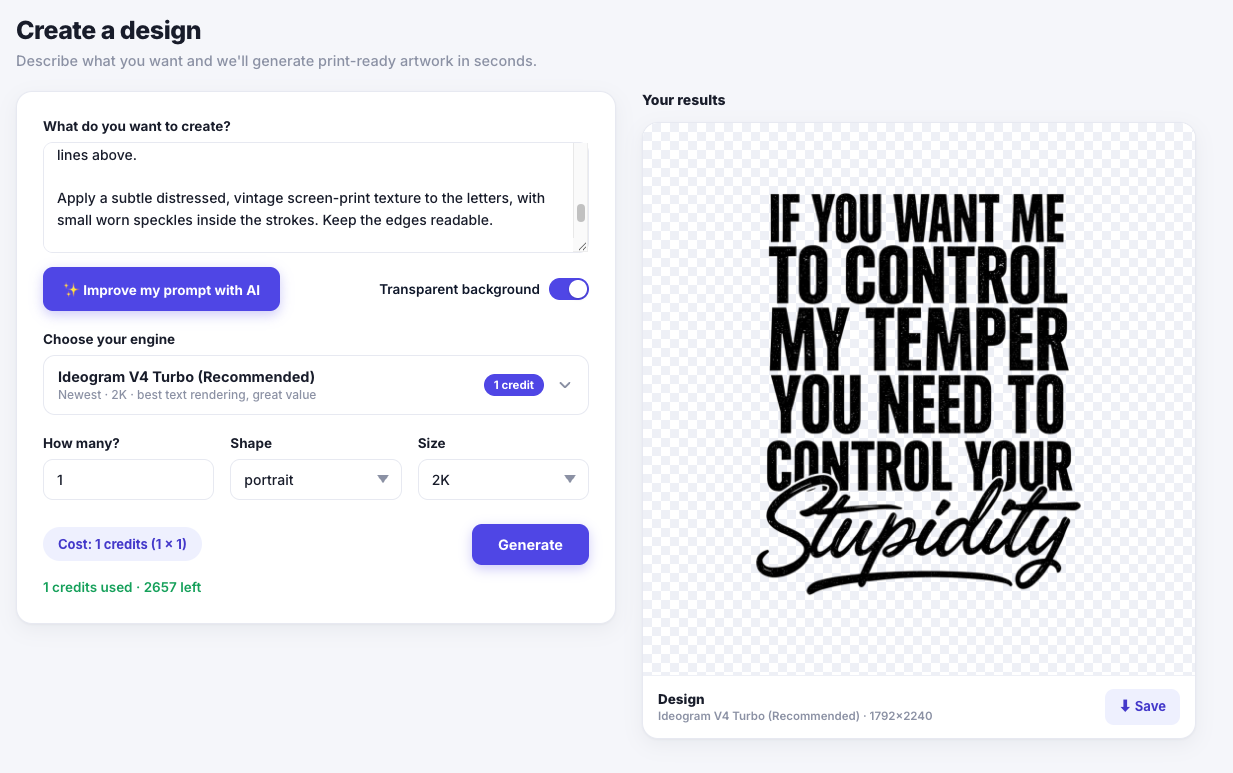
I can also choose the shape of the design:
- Portrait for coffee mugs and T-shirts
- Landscape for some posters
- Square when it fits better
I create 5-6 designs for each idea, then pick the best ones to test.
Here are a few designs I made with LzyPOD:
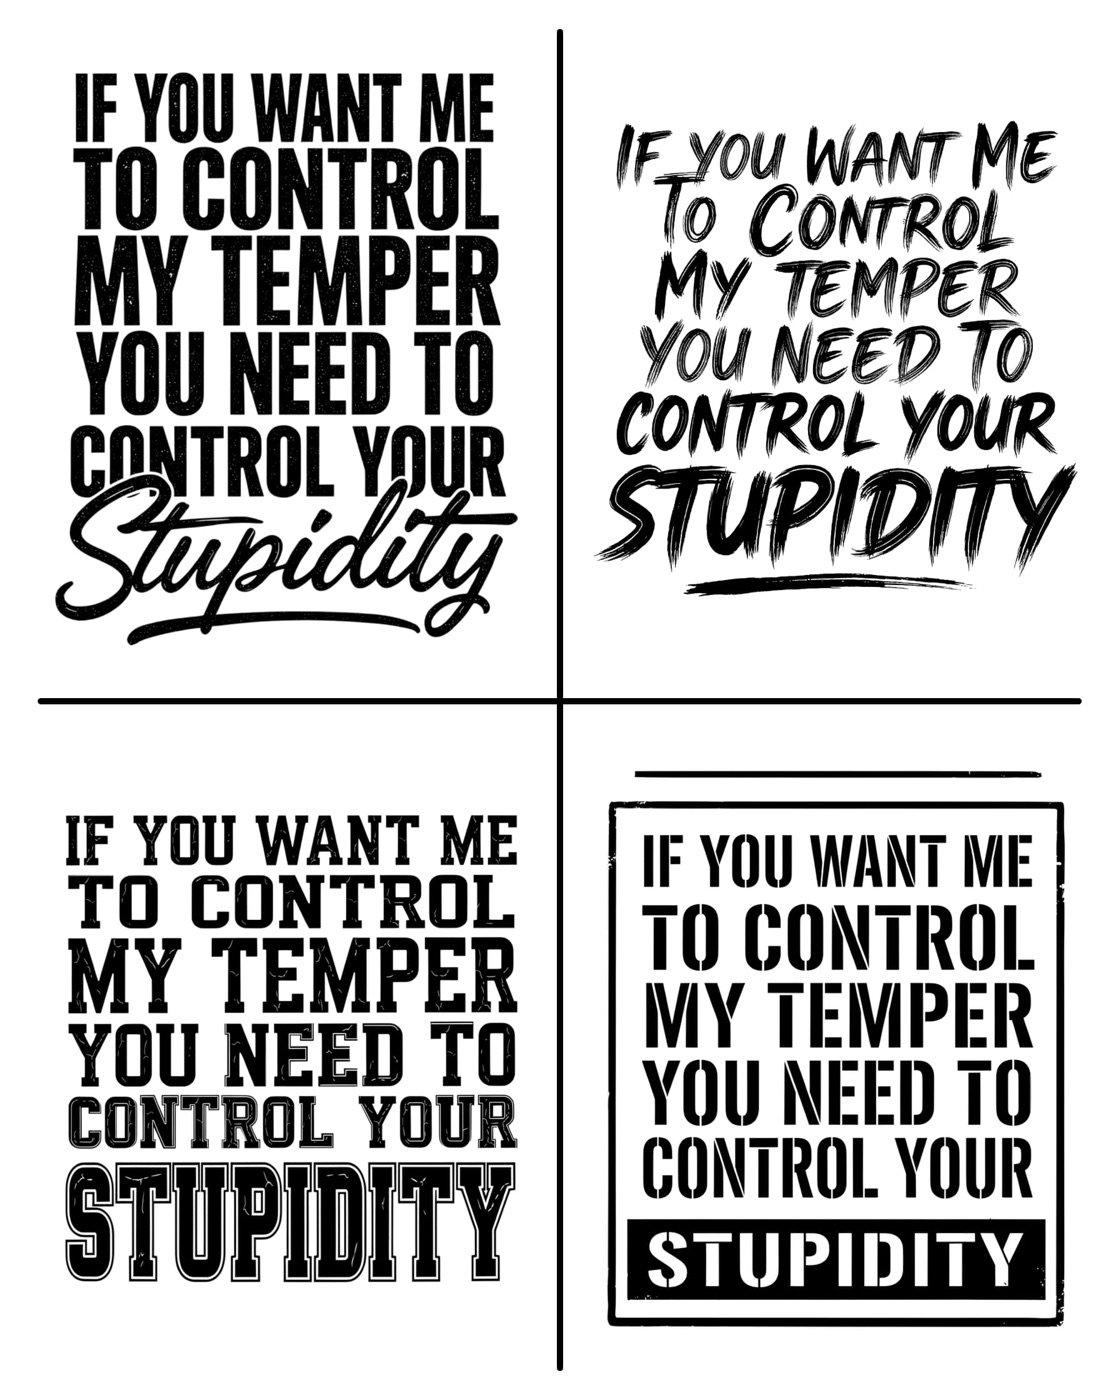
Not bad for someone who can’t draw, right? lol
Before I keep a design, I ask myself one question: “Would someone in my niche actually buy this?”
If not, it’s out. Remember: AI does the making. I do the deciding.
Step 6: Create Products and Upload Them to My Store
Next, I create the products on CustomCat and push them to my Shopify store.
The products are linked between CustomCat and my store. When an order comes in, it’s sent to CustomCat automatically. They print the product, ship it, and send the tracking number back to my store.
Basic print-on-demand 101. :)
I only launch 2-3 new products a day.
Why so few? Because every product gets a real ad test, and tests cost money. I’ll show you my test budget in Step 8.
Step 7: Make the Product Listing Look Good
Product Mockups
The mockups I get from CustomCat are plain. Just the product with my design on a white background.
That’s okay for a catalog, but it’s too boring for Facebook Ads.
So I go back to LzyPOD and open the Product Mockup tool. It’s the tool I use the most in LzyPOD, and it’s super simple:
- Upload the plain product mockup I got from the supplier site
- Pick the options I want, like Faceless man or Streetwear vibe
- Add more details in the “Any special instructions?” box
- Hit generate
The “Any special instructions?” box is where the magic happens. I tell the AI exactly what I want to see, like “put the mug on a wooden desk next to a laptop” or “cozy coffee shop with morning light.”
The AI follows my instructions and creates the mockup I have in mind. No photographer. No photo studio. No Photoshop skills needed. lol
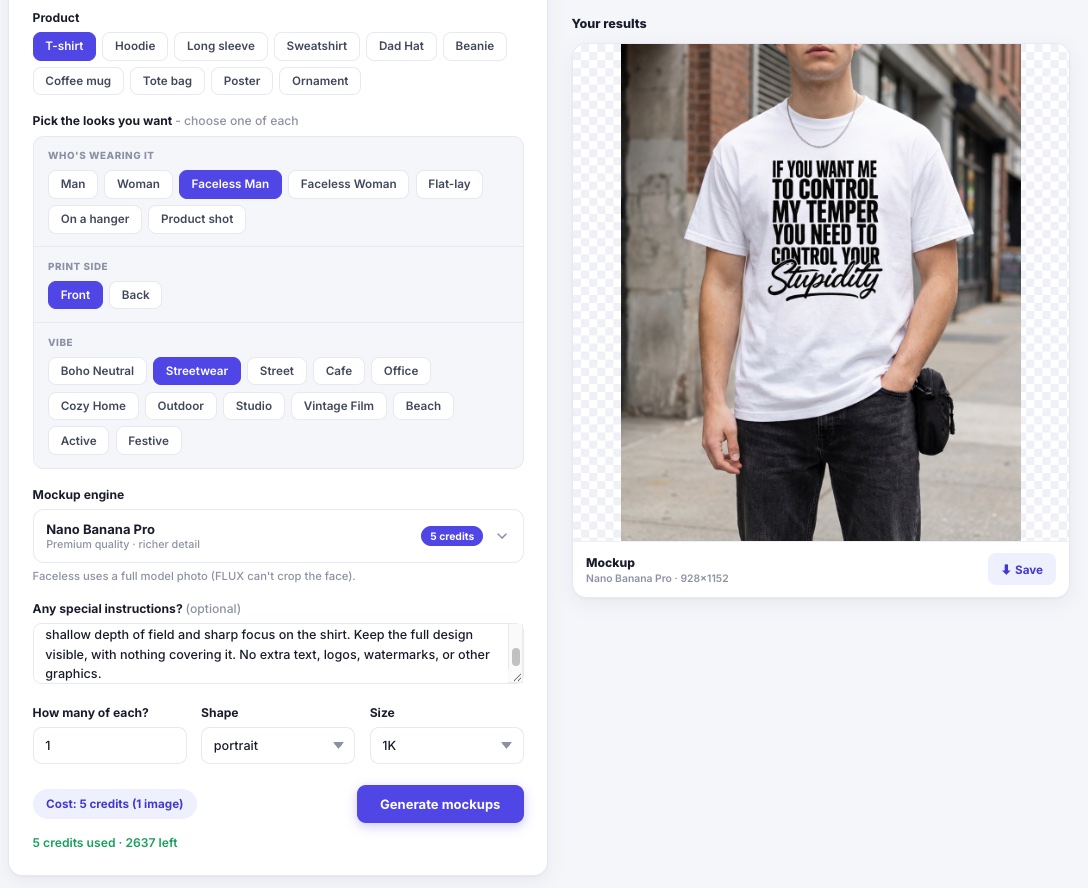
In seconds, the boring mockup turns into beautiful lifestyle photos. A mug on a cozy kitchen table. A shirt on a real-looking person.
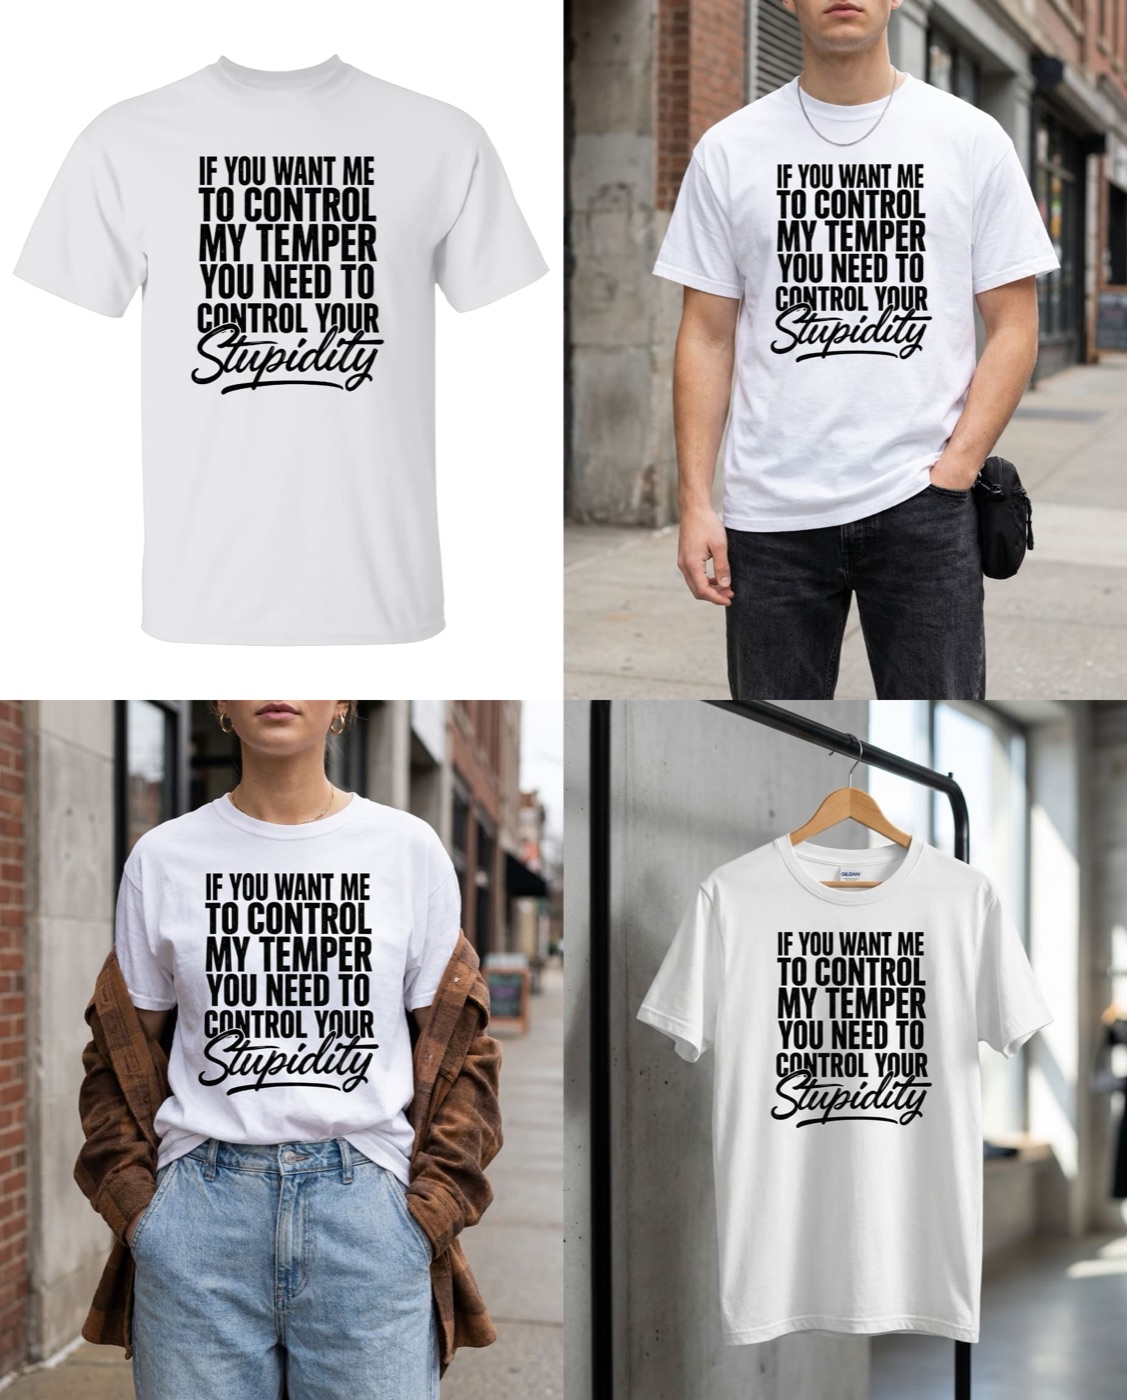
The plain supplier mockup (top left) vs. the lifestyle photos from LzyPOD.
I use this tool almost every day. I use the photos on my product pages and in my Facebook Ads.
My conversion rate improved a lot after I did this. People love lifestyle photos more than plain product images.
Product Videos
LzyPOD also makes videos. There are three video tools: Video Ads, Product Video, and Image to Video.
Video Ads is the one I use the most.
It’s like hiring a video guy from Fiverr to make a video ad for your product. But much faster and cheaper. lol
Here’s how it works:
- Upload a photo of the product
- Add some lifestyle photos (the ones I made with the Mockup tool earlier)
- Enter the product details
- Hit generate
The AI reads the product info, then creates a video ad with a voiceover for me.
Here’s an example:
I don’t use Product Video and Image to Video much. Sometimes I use Image to Video when I want a specific scene for my video.
Here’s what I’ve found. When I test a new product, I start with image ads. When I scale a winner, I add video ads to the campaign.
Video ads have been great for scaling.
I also post these videos on my store’s Facebook Page and Instagram to get some free traffic. More on that in Step 11.
Product Title and Description
Then I use Claude to write the product title, description, meta title, and meta description.
My prompt is simple:
“Here’s my product: [product details]. Act as a top SEO expert and write the title, description, meta title, and meta description for this product.”
I copy and paste the results into my Shopify product listing.
Last, I add tags and put the new products into the right collections. This helps shoppers find products easily in my store.
Step 8: Launch Facebook Ads (With My Own AI-Built Tool)
Now it’s time to launch ads.
I see many people use AI to launch and manage their Facebook Ads. I don’t.
But I did something a bit different.
Instead of letting AI into my Ads Manager, I asked AI to build me a tool that launches campaigns the exact way I do.
I built it in a few hours over one weekend.
Here’s what my tool does:
- Creates my 3 types of campaigns (sorry, these are secret too lol)
- Sets up the campaign for me: ABO or CBO, daily budget, interests, and uploads the ads
- Shows campaign stats without opening Ads Manager
- Gives me a list of next steps. AI looks at the numbers and suggests what to do. I choose.
It’s like a custom automation tool built just for me. Now it takes me only a few minutes to create a campaign for each product.
My test budget
Here’s how I test a new product:
- $15 a day per product
- Run it for 3 days
Max test cost = $15 x 3 days = $45 per product
What a winner looks like
- CPC lower than $1
- Cost per purchase at least 30% lower than my breakeven
Credit where credit is due: I learned this way of testing from Chris Blair. If you want to learn more, check out this video on the ShineOn channel where he was a guest: $5/Day Facebook Ad Strategy That Kills Losers in 48 Hours (Chris Blair’s Filter Method). It’s worth watching. :)
Using the T-shirt example from Step 1, my breakeven is $12.95. So a winner should get sales at around $9 or less per purchase.
If a product doesn’t hit these numbers, it gets cut in Step 1.
Honestly, I think this is enough for a solo seller like me. You don’t need tons of campaigns or AI running your ads to make big sales. You just need good products and a simple way to test them.
Steps 3-8 take me about 3 hours. Then I take another break.
Step 9: Scale Winning Campaigns (11:00 PM)
At around 11:00 PM, I check my ads again. It’s daytime in the US now, so I can see how today is going.
I look for campaigns I can scale. There are two ways I do it:
- Increase the daily budget. This takes a few seconds.
- Create new campaigns for a winning product. My tool does this in a few minutes per campaign.
I still don’t use AI to make these decisions. The only AI I use here is LzyPOD, to create new mockups or videos for the ads.
This step takes me 30 minutes to 1 hour.
And this is how the big days happen. During the holidays, I’ve had $10,000+ days. The latest one was this past Father’s Day.
ifourth @ifourth Two $10k days in a row 🔥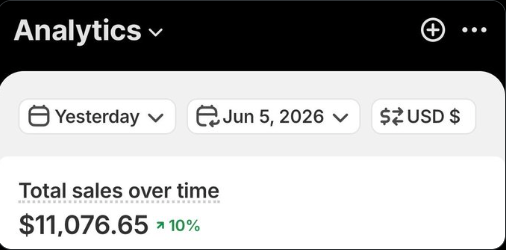
How about this Q4? The $10k day is still in the making. :)
To be clear, these don’t happen every day. They’re holiday days. But they come from the same boring routine I do every single day.
Step 10: Store Housekeeping with Claude Code (1-2 Times a Week)
This is one of my favorite tricks.
In case you don’t know, Shopify lets you create a private app for your store. You give the app some permissions, and Shopify gives you an API key.
I give that API key to Claude Code. Now Claude Code can work on my store for me.
Honestly, it feels like having Jarvis from Iron Man for my Shopify store. I just tell it what I want, and it gets done. I feel like Tony Stark every time I use it. lol
I just tell it what I want, like:
- “Hey, can you change the announcement message in the top bar for me?”
- “Hey, check all product listings, act as a top SEO expert, and update them for me.”
- “Hey, update the price of all coffee mugs to $19.95 and the compare-at price to $24.95.”
And it’s done. Jobs that used to take me an hour now take a minute.
I use it for updating prices, managing collections, adding or removing products, updating my theme, and more.
Stay safe with this:
- Don’t turn on all permissions at once. Give Claude Code a task first. It will tell you which permissions it needs, then you turn on just those in your private app
- Keep your API key private. Never share it anywhere else
- Test on one product first before changing all of them
- Ask Claude Code to show you the changes before it makes them
Step 11: Post on Social Media with LzyPost (Every 2 Months)
I already spent time (and money) creating lifestyle photos and videos. So I want to get the most out of them.
Apart from my store and Facebook Ads, I also post them on my store’s Facebook Page and Instagram with LzyPost. It’s a social media scheduling tool for Shopify sellers.
The goal is simple: keep my pages fresh and get some free sales.
It doesn’t take much time. I just paste a list of product URLs into LzyPost. It pulls the product info and images, then writes the post messages for me. If I want a video post, I just swap the image for a video.
I prepare two months of posts at a time. It takes me about an hour.
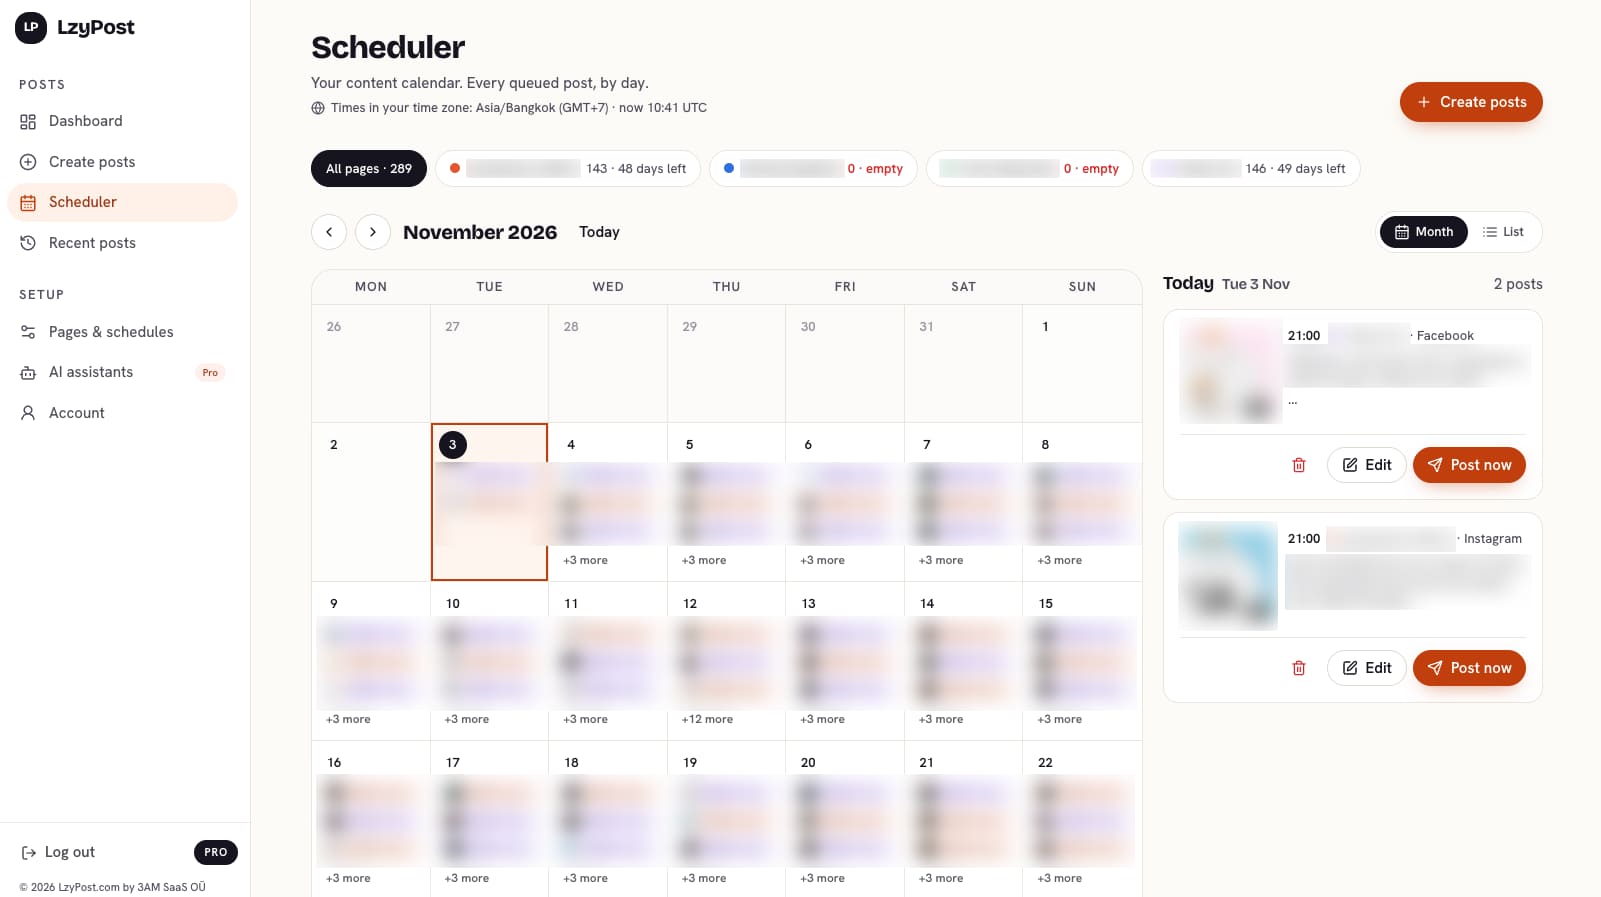
Videos do really well here because they show up as Reels on Instagram. They bring lots of new visitors to my stores. For free!
Who Does What
Here’s my whole routine in one table:
| Job | Who does it | Tool |
|---|---|---|
| Check and cut ads | Me | Ads Manager |
| Reply to Facebook comments | Me + AI | Claude |
| Reply to customer emails | AI drafts, I hit send | LzyReply |
| Find ideas | Me first, then AI | Etsy, Amazon, Claude |
| Choose products | AI suggests, I pick | Claude |
| Designs, mockups, videos | AI | LzyPOD |
| Product titles and descriptions | AI | Claude |
| Launch ads | My AI-built tool, I decide | My own tool |
| Scale winners | Me | Ads Manager, my own tool |
| Store housekeeping | AI | Claude Code |
| Social media posts | AI | LzyPost |
As you can see, AI does almost all the making.
But look at the jobs I still do myself: finding ideas, cutting ads, and scaling ads.
They’re all decisions.
That’s a Wrap
A few years ago, I needed a team to run my print-on-demand business. A designer, a VA, and a video editor.
Now I run two stores by myself in about 4-5 hours a day.
AI took over the jobs I’m bad at, like designing, making videos, and writing in perfect English. But it didn’t take over the decisions. And the decisions are what make the money.
So here’s my advice:
Let AI do the making. You do the deciding.
If you want to start, pick one niche and build one store. Test 2-3 products a day with $15 each. Cut the losers fast and scale the winners.
Do it every day. It’s boring. But boring works.
Remember, you’re always one product away. :)
If you have any questions, feel free to send me a message on X (@ifourth). I’ll try to answer every question.
Enjoy the process,
Bank “Solo Seller” K.
P.S. If you want to try the AI tool I use every day for designs, mockups, and videos, check out LzyPOD here.
P.P.S. If you know anyone who’s still doing everything by hand in their POD business, please share this post with them. It would mean the world to me. :)
